Tuesday 18 August 2020

Fredericksburg Solo – The Game

Whenever I start a solo game I always think that it won’t be very much fun but every time I’m surprised at just how gripping it can be and this game certainly turned out to be a good one right down to the last turn.

10.00 am and the advance against Marye's Heights commences with French's Division pushing forward towards the stone wall while Howard moves up on his right. The Union casualties are heavy but so are those of the defending Confederates as the supporting rifled artillery batteries firing from across the Rappahannock take their toll.
Further to the left Franklin gets the Divisions of Meade and Gibbon moving forward. Meade takes advantage of the cover provided by the woods to his front to move on a gap in the Confederate position (in the real battle the Confederates left this approach unguarded as they considered the woods impenetrable).
By now French's lead Brigade (Kimball) has fallen back having been reduce to just 1SP by the fierce enemy fire. Palmer's Brigade has moved to the front following a successful passage of lines. The men are taking a pasting however the Rebs behind the wall are taking fire too and are also down to just 1SP.
As the time approaches noon, General Robert E Lee looks on at the unfolding drama below from his position on the ridge behind McLaws Division.
Meade's Division is now driving deep into the Confederate position. Meanwhile Gibbon's attack has stalled under the weight of fire from the enemy although the boys in blue are giving as good as they get. Encouraged by the reports he is receiving from Franklin, Burnside makes the decision to disengage Hancock at Fredericksburg so that Howe may be activated to support Gibbon. Incredibly the Union make the necessary die roll's to disengage Hancock but they still need to issue orders to Howe.
Then an incredible stroke of luck - a volley from Palmer takes out Wright's Confederate Brigade on Marye's Heights (the Union rolled 4 hits and the Rebs failed to save a single one!). There is now a chance that French's Brigade may get a foothold on the ridge. Suddenly Burnside's change of orders is looking like a mistake as Hancock is no longer available to lend support.
Meade and Gibbon are now pressing hard on the left coming close enough to the Confederates for D H Hill to be released from reserve. Both sides have been losing Brigades but so far neither side has reached its DEM level.
French's men were not allowed to use ASSAULT orders however with the stone wall vacated I decided on a die roll to see whether or not the Union troops could occupy the empty position - and they did! The Confederate Brigade opposite Palmer was down to 1SP and with the Rebs currently on a DEM of 4 there was a very real chance of victory if this Brigade could be eliminated by a determined volley.
On the left Meade was having a run of luck despite the fact that D H Hill was manoeuvring on his flank. However a command failure at Corps level meant that Howe had still not received the order to advance and support either himself or Gibbon.
Back on the right, Palmer fired another volley but this time - MISSED! The Confederates were able to carry out a passage of lines to shore up their position on Marye's Heights. The chance of a Union victory had been tantalisingly close but the moment had now passed.
On the left the fighting was fluid and brutal - here Brigades on both sides are routing at the same moment as Meade hangs on against the odds.
Finally the Union troops were forced back from Marye's Heights. With French and Howard's Division's both decimated and no reserves being brought forward the fighting here was over - it was 2.30 pm, not 5 hours since the battle had started.
On the left, somehow, Meade had led a single Brigade to the Military Road to gain 1VP but he was being rapidly flanked by D H Hill.
At the end of turn 10 both sides had reached their DEM level but the Union had 7 broken Brigades whilst the Confederates had only 4. Even allowing for the extra VP for the unit on the Military Road it was a clear Rebel victory.

Although it only lasted 10 turns the game had plenty of twists and turns with a Union victory in grasp on turn 7 that slipped away to a 7:5 victory for the Confederates. Although defeated, the Army of the Potomac did well having briefly gained Marye's Heights and giving the Rebs a tough run for their money on the left. The command restrictions imposed on the Union forces added an extra dimension to play and I may use the idea of ‘active’ and ‘inactive’ divisions again in future solo games.

Friday 7 August 2020

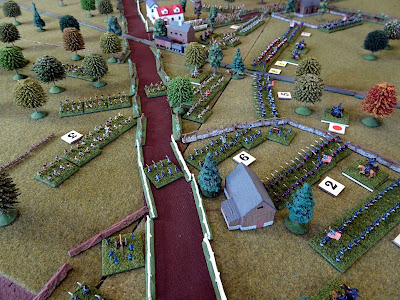
Fredericksburg Solo - Scenario

Fredericksburg is probably not a great choice for a wargame for several reasons, firstly the size - it was the biggest ever battle on American soil (the only time the Confederates managed to field over 75,000 men) fought over a six-mile front. Secondly, the terrain, coupled with Burnside's unimaginative deployment of the Union army, means there is little room for manoeuvre. Thirdly, the battle had more in common with those of 1864 being a bloody one-sided affair.

That said, I have been wanting to try to game this fascinating battle for some time as I felt that although it might be a bit dull as a traditional game, it could possibly work well as a solo endeavour. Having read in detail about the campaign I realised that although the attack on Marye’s Heights was clearly folly, the Union had a real chance of success further to their left which the generals failed to exploit.

I don’t have enough figures to represent the forces unit for unit so have scaled the OOB down by omitting some Divisions from each side, even so there will be upward of 45 Brigades in play. I have also had to contract the battlefield slightly to allow everything to fit on my 6’ x 4’ table but all the significant terrain features have been represented.

The main sources I used to compile the scenario were Battles & Leaders of The Civil War Vol 3 and Time Life’s Rebels Resurgent.

The table looking west towards Fredericksburg.
Special Rules
1. The Union had a number of heavy artillery batteries posted across the Rappahannock and to accommodate these on the table I have had to increase the range of Union rifled batteries. Rule: Union rifled artillery has a range of 25”
2. The Union attacks on Marye’s Heights were made under tactical restraints imposed by the high command. Rule: Divisional attacks on Marye’s Heights must be made in column of Brigades with no units allowed to deploy to the flanks.
3. The canal in front of Fredericksburg caused problems for the advancing Union troops who became bunched as they crossed via narrow bridges. Rule:  It takes one turn to cross the canal and during this turn the Confederates +1 to all artillery die rolls.
4. Hazel Run was an obstacle that effectively divided the battlefield. Rule: Hazel Run is impassable terrain except via the bridge.

The view from the Union left flank.

Order of Battle

Army of the Potomac - Burnside
Left Grand Division – Franklin
1st Corps – Reynolds
1st Division – Doubleday
2nd Division – Gibbon
3rd Division – Meade

6th Corps – Smith
1st Division – Brooks
2nd Division – Howe

Right Grand Division – Sumner
2nd Corps – Couch
1st Division - Hancock
2nd Division – Howard
3rd Division – French
2nd Division (5th Corps) – Sturgis

Army of Northern Virginia – Lee
Left Wing – Longstreet
Ransom’s Division
McLaws’ Division
Hood’s Division

Right Wing – Jackson
A P Hill’s Division
D H Hill’s Division
Stuart – Fitzhugh Lee’s cavalry Brigade

The view from the Union central position.

Command Restrictions
1. No ASSAULT orders may be given to any Union Brigade.
2. The maximum number of active Union Divisions is limited to 5. To activate any other Division a currently active Division must be ordered to retire and issued with HOLD orders. All orders are subject to the usual command die rolls (Burnside is graded as D, all other Union commanders are C).
3. Doubleday’s Division was tasked with holding the extreme left of the Union line and his Division may not be activated unless enemy infantry come within 10”.
4. D H Hill’s Division is held in reserve and may not activate unless enemy infantry come within 6”.

The view from the Union right flank.

Initial Orders
Gibbon, Meade, French, Hancock & Howard – ENGAGE
All other Union Divisions and all Confederate Divisions - HOLD

Victory Conditions
Union DEM = 6
Confederate DEM = 5
The union side claims 1 VP for each unbroken brigade on Marye’s Heights or penetrating as far as the Military Road.

Sunday 24 May 2020

Seven Pines Solo – Conclusion

7:00pm and the exhausted Confederates continue to attack the Union forces at Seven Pines crossroads. Both sides are cycling fresh troops onto the firing line risking 'passage of lines' morale checks.
At Fair Oaks the Federals have a small success by breaking Law's Brigade with a combination of canister and rifle fire, however the Union troops are themselves shaken and unable to follow up.
Turn 14 was twilight which meant no long range artillery fire. At this point Johnston strayed too close to the firing line and was himself wounded (a 50% chance to recreate the historical risk). Bad news for the North as this will result in Robert E Lee being promoted to command of the Army of Northern Virginia.

Turn 15 was a night turn which meant I could re-dress the lines, bring on reinforcements and remove all shaken and broken markers returning units to good morale, I also allowed some limited SP recovery for units with 6SP’s or less.

The Confederates ended day one without taking Seven Pines so they started day two with a 1DEM handicap increased to 2DEM as they had 2 destroyed Brigades against 1 for the Union. This meant that the Federals had a small but significant advantage over the Rebels for day two.

The view at dawn on June 1st. The rest of Sumner's corps has come up over night to strengthen the line opposite Fair Oaks. The Confederates had Huger's Division arrive by the Twin Houses ready to support the attack on Seven Pines.
4:30am and Wilcox and Pickett successfully assault the Union line just north of Seven Pines routing Birney and Jameson.
Simultaneously, Armistead carries the trench line in front of the crossroads, the Rebels are now just 1VP short of victory.
And that total is reached as Hood's men charge forward and break Dana - game over!
The situation at the end of play, Turn 17 (5:00am). Enlarge the image to read the unit labels.

The Confederate victory came slightly against the run of play and if I had finished the turn it is possible the Reb’s would also have reached their DEM level, however I felt that as they had taken the Seven Pines crossroads it was right to call the game in their favour.

The total SP losses were Confederates 89, Union 58. The most heavily engaged Confederate Division was R H Anderson’s veterans who lost 31 SP’s and had 2 Brigades destroyed (Kemper and Pickett). On the Union side Keyes Corps lost 29 out of 69 SP’s with one Brigade destroyed (Palmer), many of these casualties were incurred in the first few hours of the battle.

Friday 15 May 2020

Seven Pines Solo Turns 7-12

Kearny's Division arrives at Seven Pines to help shore up the line held by Keyes battered Corps. The time is 4.00pm and D H Hill has called off his attack on the crossroads whilst Longstreet sends Anderson's Division through the woods in an effort to turn the Union right flank.
In response to the new Rebel move Heintzelman pushes Kearny towards Fair Oaks. Fortunately Sumner arrives on his right in the nick of time, heading directly for Fair Oaks Station.
But now the Confederates are receiving reinforcements too in the shape of Whiting's Division pouring down the Nine Mile Road. The area of action is rapidly expanding as it engulfs both Seven Pines and Fair Oaks.
Anderson's veteran Brigades wheel to their right and begin the attack along the Nine Mile Road towards Keyes flank.
However, the time for an easy Rebel victory has gone as more and more Northern Brigades deploy between Seven Pines and Fair Oaks Station. Jenkin's Brigade pushes forward but is subject to a withering fire from front and flank as it emerges from the tree line. Shaken, Jenkin's moves back to allow Kemper to take his place.
At Fair Oaks, a rare breakdown in the Confederate command chain causes Smith to delay one turn in fully deploying Whiting's Division. This enables Sedgwick to form a line of battle near the station and bring up his artillery.
Back at Seven Pines the Union front line is worn but holding and manages somehow to cause Kemper to falter. The steam is going out of Anderson's attack.
Smith finally manages to get Whiting into line of battle and a fierce fire-fight erupts by Fair Oaks Station. The time is 6.30pm and Johnston has arrived on the front line to take personal control of the battle.

The situation at the end of Turn 12. Zoom in to read the unit labels.

Thursday 7 May 2020

Seven Pines Solo Turns 1-6

1.00 pm and D H Hill advances astride the Williamsburg Stage Road smashing into Casey's Division. Garland's Brigade successfully assault Naglee breaking the right of the Union line.
Taking advantage of their success the Rebels move to outflank the entrenchments at the Twin Houses. Casey tries to withdraw Naglee's now isolated Brigade but fails the command test.
Naglee makes a good fight of it making a dent in the Brigades of Rodes and Rains but is eventually broken and the entrenchments are overrun. Casey himself is wounded during the fighting and carried to the rear.
The Confederates continue to push on towards Seven Pines whilst what's left of  Casey's Division (foreground) reform to the rear of Couch's men. The red counter denotes that Casey has become a casualty.
By now Garland has advanced up to the abatis but has become isolated from his supports. D H Hill tries to call the Brigade back but fails the required command test (it is harder than usual for the Confederates to change orders to represent the poor command performance during the real battle). With 2 Federal batteries and a host of rifles aimed at them it is no surprise that Garland is destroyed shortly after.
Longstreet arrives with three more Brigades to bolster the Confederate attack. By now D H Hill's Division has been seriously depleted and will need support if they are to take Seven Pines.
3.30 pm and the first of the Union reinforcements arrive. These are the van of Heintzelman's II Corps coming in along the Williamsburg Stage Road and the Richmond & York River RR.
The state of play at the end of Turn 6 - zoom in to read the unit labels.

Tuesday 5 May 2020

Seven Pines OOB

For the army OOB's I have drawn largely from the Fire & Fury scenario with a few tweaks from reading various accounts of the battle. The numbers in brackets on the OOB's are the starting strength points for each brigade, unusually in this fight the Confederate units are mostly stronger than those of the Union.


Initial dispositions - zoom in to read the unit labels

Army of the Potomac
McClellan

II Corps - Sumner
Corps Artillery (9)

1st Division - Sedgwick
Gorman (9)
Burns (9)
Dana (8)
Artillery (9)

2nd Division - Richardson
Howard (10)
Meagher (8)
French (9)
Artillery (9)

III Corps - Heintzelman

1st Division - Kearny
Berry (7)
Birney (7)
Jameson (7)
Artillery (9)

2nd Division - Hooker
Sickles (10)
Paterson (8)

IV Corps - Keyes
Corps Artillery (9)

1st Division - Couch
Peck (7)
Abercrombie (7)
Devens (6)
Artillery

2nd Division - Casey
Naglee (8) GREEN
Wessells (7) GREEN
Palmer (7) GREEN
Artillery

Casey's Division near the Twin Houses. Casey's men were mostly raw recruits hence the GREEN status on the OOB

Army of Northern Virginia
Johnston

Left Wing - G W Smith

Whiting's Division
Law (9)
Pettigrew (9)
Hampton (9)
Hatton (9)
Hood (9)
Artillery

Right Wing - Longstreet
Corps Artillery (8)

D H Hill's Division
Garland (9)
Rodes (9)
G B Anderson (9)
Rains (8)
Battery (8)

Huger's Division
Armistead (9)
Mahone (9)
Artillery (8)

R H Anderson's Division
Jenkins (9) VETERAN
Kemper (9) VETERAN
Pickett (9) VETERAN
Wilcox (9) VETERAN
Pryor (9)
Colston (9)
Artillery

D H Hill's Division about to unleash their fury on the Yankees

Victory Conditions
The Army Demoralisation Level (DEM) is equal to the current number of broken infantry brigades either on table or removed from play.

DEM on day 1
Union – 3
Confederate – 4
If the Confederates do not hold the crossroads at Seven Pines at the end of Day 1 they start Day 2 with +1 DEM

The DEM is reset on Day 2 but the side with the highest DEM score from day 1 starts with a DEM level of 1.

DEM on day 2
Union - 4
Confederate – 5

Sunday 3 May 2020

Seven Pines Set Up

My next solo game will be a re-fight of the Battle of Seven Pines (Fair Oaks), the turning point in McClellan’s Peninsular campaign. The battle was fought over a relatively small area so I will be playing on a 4’ x 4’ table that represents 16 square miles of actual terrain.

This is the table looking north - zoom in to read the place names
Fair Oaks Station
The crossroads at Seven Pines (count the pine trees!)
Looking north towards Seven Pines, the Twin Houses are to the left.
Looking southeast along the Nine Mile Road towards Fair Oaks
The Adams House
The Twin Houses - as Mathew Brady might have photographed them
The Hyer House near the Richmond & York River RR (the track is by Irregular Miniatures)

My main reference for the terrain is the map in the Fire & Fury Eastern Battles Scenario Book but I have also dipped into Battles & Leaders of the Civil War (Vol II) and the excellent Time Life Book Forward to Richmond.

Next, I’ll be deploying the troops and finalising the scenario rules.